Hacking Super Mario Bros. with Python
This weekend I was coming home from the meeting of the LSST Dark Energy Science Collaboration, and found myself with a few extra hours in the airport. I started passing the time by poking around on the imgur gallery, and saw a couple animated gifs based on one of my all-time favorite games, Super Mario Bros. It got me wondering: could I use matplotlib's animation tools to create these sorts of gifs in Python? Over a few beers at an SFO bar, I started to try to figure it out. To spoil the punchline a bit, I managed to do it, and the result looks like this:
This animation was created entirely in Python and matplotlib, by scraping the image data directly from the Super Mario Bros. ROM. Below I'll explain how I managed to do it.
Scraping the Pixel Data
Clearly, the first requirement for this pursuit is to get the pixel data used to construct the mario graphics. My first thought was to do something sophisticated like dictionary learning on a collection of screen-shots from the game to build up a library of thumbnails. That would be an interesting pursuit in itself, but it turns out it's much more straightforward to directly scrape the graphics from the source.
It's possible to find digital copies of most Nintendo Entertainment System (NES) games online. These are known as ROMs, and can be played using one of several NES emulators available for various operating systems. I'm not sure about the legality of these digital game copies, so I won't provide a link to them here. But the internet being what it is, you can search Google for some variation of "Super Mario ROM" and pretty easily find a copy to download.
One interesting aspect of ROMs for the original NES is that they use raw byte-strings to store 2-bit (i.e. 4-color), 8x8 thumbnails from which all of the game's graphics are built. The collection of these byte-strings are known as the "pattern table" for the game, and there is generally a separate pattern table for foreground and background images. In the case of NES games, there are 256 foreground and 256 background tiles, which can be extracted directly from the ROMs if you know where to look (incidentally, this is one of the things that made the NES an "8-bit" system. 2^8 = 256, so eight bits are required to specify any single tile from the table).
Extracting Raw Bits from a File
If you're able to obtain a copy of the ROM, the first step to getting at the
graphics is to extract the raw bit information.
This can be done easily in Python using numpy.unpackbits
and numpy.frombuffer or numpy.fromfile.
Additionally, the ROMs are generally stored using
zip compression. The uncompressed data can be extracted using Python's
built-in zipfile module. Combining all of this, we extract the raw file
bits using a function like the following:
import zipfile
import numpy as np

def extract_bits(filename):
    if zipfile.is_zipfile(filename):
        zp = zipfile.ZipFile(filename)
        raw_buffer = zp.read(zp.filelist[0])
        bytes = np.frombuffer(raw_buffer, dtype=np.uint8)
    else:
        bytes = np.fromfile(filename, dtype=np.uint8)
    return np.unpackbits(bytes)
This function checks whether the file is compressed using zip, and extracts the raw bit information in the appropriate way.
Assembling the Pattern Tables
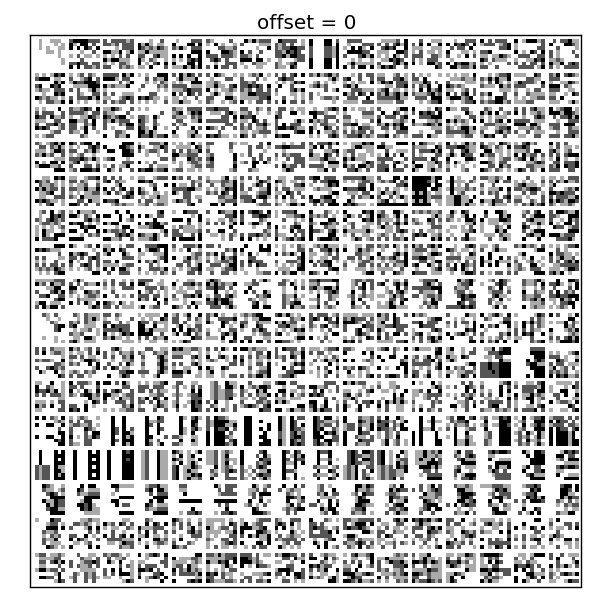
The thumbnails which contain the game's graphics patterns are not at any set location within the file. The location is specified within the assembly code that comprises the program, but for our purposes it's much simpler to just visualize the data and find it by-eye. To accomplish this, I wrote a Python script (download it here) based on the above data extraction code which uses matplotlib to interactively display the contents of the file. Each thumbnail is composed from 128 bits: two 64-bit chunks each representing an 8x8 image with one bit per pixel. Stacking the two results in two bits per pixel, which are able to represent four colors within each thumbnail. The first few hundred chunks are difficult to interpret by-eye. They appear similar to a 2D bar code: in this case the "bar code" represents pieces of the assembly code which store the Super Mario Bros. program.
Scrolling down toward the end of the file, however, we can quickly recognize the thumbnails which make up the game's graphics:
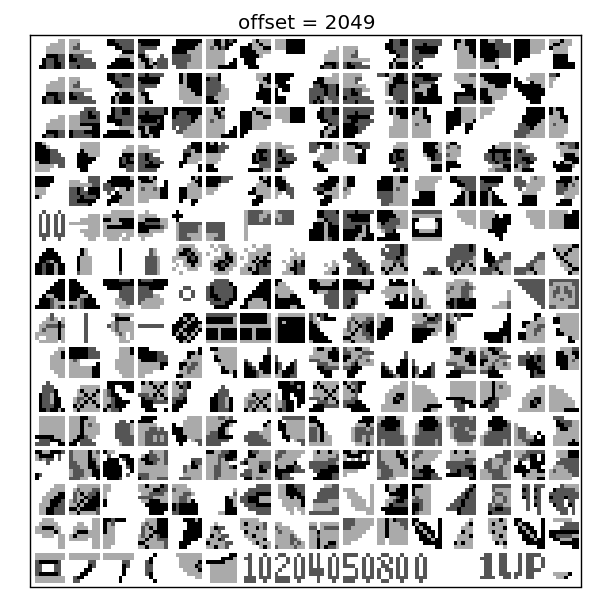
This first pattern table contains all the foreground graphics for the game. Looking closely, the first few thumbnails are clearly recognizable as pieces of Mario's head and body. Going on we see pieces of various enemies in the game, as well as the iconic mushrooms and fire-flowers.
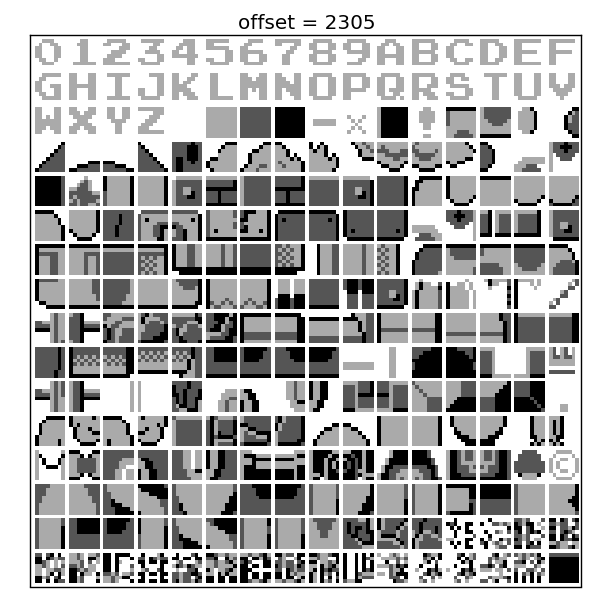
The second pattern table contains all the background graphics for the game. Along with numbers and text, this contains the pieces which make up mario's world: bricks, blocks, clouds, bushes, and coins. Though all of the above tiles are shown in grayscale, we can add color by simply changing the matplotlib Colormap, as we'll see below.
Combining Thumbnails and Adding Color
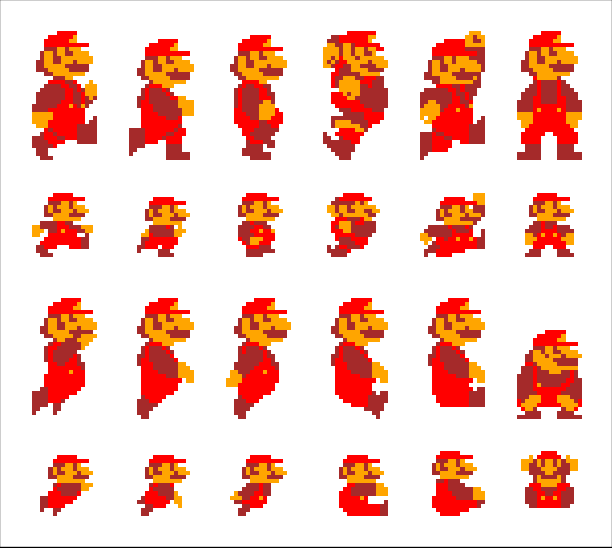
Examining the pattern tables above, we can see that big Mario is made up of eight pattern tiles stitched together, while small Mario is made up of four. With a bit of trial and error, we can create each of the full frames and add color to make them look more authentic. Below are all of the frames used to animate Mario's motion throughout the game:
Similarly, we can use the thumbnails to construct some of the other familiar graphics from the game, including the goombas, koopa troopas, beetle baileys, mushrooms, fire flowers, and more.
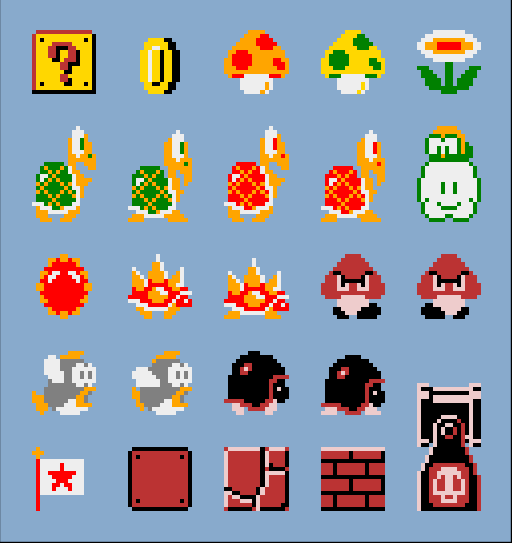
The Python code to extract, assemble, and plot these images can be downloaded here.
Animating Mario
With all of this in place, creating an animation of Mario is relatively easy. Using matplotlib's animation tools (described in a previous post), all it takes is to decide on the content of each frame, and stitch the frames together using matplotlib's animation toolkit. Putting together big Mario with some scenery and a few of his friends, we can create a cleanly looping animated gif.
The code used to generate this animation is shown below. We use the same
NESGraphics class used to draw the frames above, and stitch them together
with a custom class that streamlines the building-up of the frames.
By uncommenting the line near the bottom, the result will be saved as an
animated GIF using the ImageMagick animation writer that I
recently contributed
to matplotlib. The ImageMatick plugin has not yet made it into a
released matplotlib version, so using the save command below will
require installing the development version of matplotlib, available for
download on github.
"""Extract and draw graphics from Mario

By Jake Vanderplas, 2013 <http://jakevdp.github.com>
License: GPL.
Feel free to use and distribute, but keep this attribution intact.
"""
from collections import defaultdict
import zipfile
import numpy as np
from matplotlib import pyplot as plt
from matplotlib.colors import ListedColormap
from matplotlib import animation


class NESGraphics(object):
    """Class interface for stripping graphics from an NES ROM"""
    def __init__(self, filename='mario_ROM.zip', offset=2049):
        self.offset = offset
        if zipfile.is_zipfile(filename):
            zp = zipfile.ZipFile(filename)
            data = np.unpackbits(np.frombuffer(zp.read(zp.filelist[0]),
                                               dtype=np.uint8))
        else:
            data = np.unpackbits(np.fromfile(filename, dtype=np.uint8))
        self.data = data.reshape((-1, 8, 8))

    def generate_image(self, A, C=None, transparent=False):
        """Generate an image from the pattern table.

        Parameters
        ----------
        A : array_like
            an array of integers indexing the thumbnails to use.
            The upper-left corner of the image is A[0, 0], and the
            bottom-right corner is A[-1, -1].  A negative index indicates
            that the thumbnail should be flipped horizontally.
        C : array-like
            The color table for A.  C should have shape A.shape + (4,).
            C[i, j] gives the values associated with the four bits of A
            for the output image.
        transparent : array_like
            if true, then zero-values in A will be masked for transparency

        Returns
        -------
        im : ndarray or masked array
             the image encoded by A and C
        """
        A = np.asarray(A)
        if C is None:
            C = range(4)

        # broadcast C to the shape of A
        C = np.asarray(C) + np.zeros(A.shape + (1,))

        im = np.zeros((8 * A.shape[0], 8 * A.shape[1]))
        for i in range(A.shape[0]):
            for j in range(A.shape[1]):
                # extract bits
                ind = 2 * (abs(A[i, j]) + self.offset)
                thumb = self.data[ind] + 2 * self.data[ind + 1]

                # set bit colors
                thumb = C[i, j, thumb]

                # flip image if negative
                if A[i, j] < 0:
                    thumb = thumb[:, ::-1]
                im[8 * i:8 * (i + 1), 8 * j:8 * (j + 1)] = thumb

        if transparent:
            im = np.ma.masked_equal(im, 0)

        return im


class NESAnimator():
    """Class for animating NES graphics"""
    def __init__(self, framesize, figsize=(8, 6),
                 filename='mario_ROM.zip', offset=2049):
        self.NG = NESGraphics()
        self.figsize = figsize
        self.framesize = framesize
        self.frames = defaultdict(lambda: [])
        self.ims = {}

    def add_frame(self, key, A, C=None, ctable=None,
                  offset=(0, 0), transparent=True):
        """add a frame to the animation.
        A & C are passed to NESGraphics.generate_image"""
        cmap = ListedColormap(ctable)
        im = self.NG.generate_image(A, C, transparent=transparent)
        self.frames[key].append((im, cmap, offset))

    def _initialize(self):
        """initialize animation"""
        A = np.ma.masked_equal(np.zeros((2, 2)), 0)
        for i, key in enumerate(sorted(self.frames.keys())):
            self.ims[key] = self.ax.imshow(A, interpolation='nearest',
                                           zorder=i + 1)
        self.ax.set_xlim(0, self.framesize[1])
        self.ax.set_ylim(0, self.framesize[0])

        return tuple(self.ims[key] for key in sorted(self.ims.keys()))

    def _animate(self, i):
        """animation step"""
        for key in sorted(self.frames.keys()):
            im, cmap, offset = self.frames[key][i % len(self.frames[key])]

            self.ims[key].set_data(im)
            self.ims[key].set_cmap(cmap)
            self.ims[key].set_clim(0, len(cmap.colors) - 1)
            self.ims[key].set_extent((offset[1],
                                      im.shape[1] / 8 + offset[1],
                                      offset[0],
                                      im.shape[0] / 8 + offset[0]))

        return tuple(self.ims[key] for key in sorted(self.ims.keys()))

    def animate(self, interval, frames, blit=True):
        """animate the frames"""
        self.fig = plt.figure(figsize=self.figsize)
        self.ax = self.fig.add_axes([0, 0, 1, 1], frameon=False,
                                    xticks=[], yticks=[])
        self.ax.xaxis.set_major_formatter(plt.NullFormatter())
        self.ax.yaxis.set_major_formatter(plt.NullFormatter())
        self.anim = animation.FuncAnimation(self.fig,
                                            self._animate,
                                            init_func=self._initialize,
                                            frames=frames, interval=interval,
                                            blit=blit)
        self.fig.anim = self.anim
        return self.anim


def animate_mario():
    NA = NESAnimator(framesize=(12, 16), figsize=(4, 3))

    # Set up the background frames
    bg = np.zeros((12, 18), dtype=int)
    bg_colors = np.arange(4) + np.zeros((12, 18, 4))
    bg_ctable = ['#88AACC', 'tan', 'brown', 'black',
                 'green', '#DDAA11', '#FFCC00']

    # blue sky
    bg.fill(292)

    # brown bricks on the ground
    bg[10] = 9 * [436, 437]
    bg[11] = 9 * [438, 439]

    # little green hill
    bg[8, 3:5] = [305, 306]
    bg[9, 2:6] = [304, 308, 294, 307]
    bg_colors[8, 3:5] = [0, 1, 4, 3]
    bg_colors[9, 2:6] = [0, 1, 4, 3]

    # brown bricks
    bg[2, 10:18] = 325
    bg[3, 10:18] = 327

    # gold question block
    bg[2, 12:14] = [339, 340]
    bg[3, 12:14] = [341, 342]
    bg_colors[2:4, 12:14] = [0, 6, 2, 3]

    # duplicate background for clean wrapping
    bg = np.hstack([bg, bg])
    bg_colors = np.hstack([bg_colors, bg_colors])

    # get index of yellow pixels to make them flash
    i_yellow = np.where(bg_colors == 6)

    # create background frames by offsetting the image
    for offset in range(36):
        bg_colors[i_yellow] = [6, 6, 6, 6, 5, 5, 2, 5, 5][offset % 9]
        NA.add_frame('bg', bg, bg_colors, bg_ctable,
                     offset=(0, -0.5 * offset),
                     transparent=False)

    # Create mario frames
    mario_colors = ['white', 'red', 'orange', 'brown']
    NA.add_frame('mario', [[0, 1], [2, 3], [4, 5], [6, 7]],
                 ctable=mario_colors, offset=(2, 10))
    NA.add_frame('mario', [[8, 9], [10, 11], [12, 13], [14, 15]],
                 ctable=mario_colors, offset=(2, 10))
    NA.add_frame('mario', [[16, 17], [18, 19], [20, 21], [22, 23]],
                 ctable=mario_colors, offset=(2, 10))

    # Create koopa-troopa frames
    troopa_colors = ['white', 'green', 'white', 'orange']
    NA.add_frame('troopa', [[252, 160], [161, 162], [163, 164]],
                 ctable=troopa_colors, offset=(2, 7))
    NA.add_frame('troopa', [[252, 165], [166, 167], [168, 169]],
                 ctable=troopa_colors, offset=(2, 7))

    # Create goomba frames
    goomba_colors = ['white', 'black', '#EECCCC', '#BB3333']
    NA.add_frame('goomba', [[112, 113], [114, 115]],
                 ctable=goomba_colors, offset=(2, 4))
    NA.add_frame('goomba', [[112, 113], [-115, -114]],
                 ctable=goomba_colors, offset=(2, 4))

    return NA.animate(interval=100, frames=36)


if __name__ == '__main__':
    anim = animate_mario()

    # saving as animated gif requires matplotlib 0.13+ and imagemagick
    #anim.save('mario_animation.gif', writer='imagemagick', fps=10)

    plt.show()
The result looks like this:
Pretty good! With a bit more work, it would be relatively straightforward to use the above code to do some more sophisticated animations: perhaps recreate a full level from the original Super Mario Bros, or even design your own custom level. You might think about taking the extra step and trying to make Mario's movements interactive. This could be a lot of fun, but probably very difficult to do well within matplotlib. For tackling an interactive mario in Python, another framework such as Tkinter or pygame might be a better choice.
I hope you enjoyed this one as much as I did -- happy coding!